How Is Wood Cut When Ripping With a Table Saw?
If you have ever stood in front of a table saw and wondered exactly what happens to the wood during a rip cut, you are not alone.
Ripping is one of the most common operations in woodworking, yet many beginners and even intermediate users misunderstand the mechanics behind it. A rip cut runs the wood along the grain to reduce its width, and the table saw is the ideal tool for the job.
But poor technique, wrong blade choice, or bad fence alignment can lead to burned edges, crooked cuts, or dangerous kickback. This guide will walk you through every detail of how wood is cut during a rip, from blade mechanics to safety essentials.
Key Takeaways
- A rip cut slices wood along the grain. The board moves lengthwise past the spinning blade, and the fence sets the width of the finished piece. This is different from a crosscut, which slices across the grain to shorten a board.
- The blade teeth shear long wood fibers rather than chopping them. Rip blades use flat top grind (FTG) teeth with deep gullets to remove material quickly along the grain. A 24 to 30 tooth blade is standard for ripping on a 10 inch table saw.
- The rip fence must be perfectly parallel to the blade. Even a small misalignment can pinch the wood against the blade, causing burn marks, deflection, or kickback. Always check your fence alignment before you begin.
- Feed rate directly affects cut quality. Pushing the board too fast causes the blade to deflect and the cut to wander. Pushing too slowly causes friction and burn marks. A steady, moderate speed produces the best results.
- Safety devices like riving knives and push sticks are essential. Ripping puts constant pressure on the blade and generates a higher kickback risk than crosscutting. A riving knife prevents the wood from closing on the back of the blade. A push stick keeps your fingers away from the spinning teeth.
- Grain direction and moisture content change how the cut behaves. Straight grain produces clean, predictable cuts. Wavy or figured grain increases tearout. Wet or resinous lumber adds friction and requires slower feed rates.
What Does Ripping Mean on a Table Saw
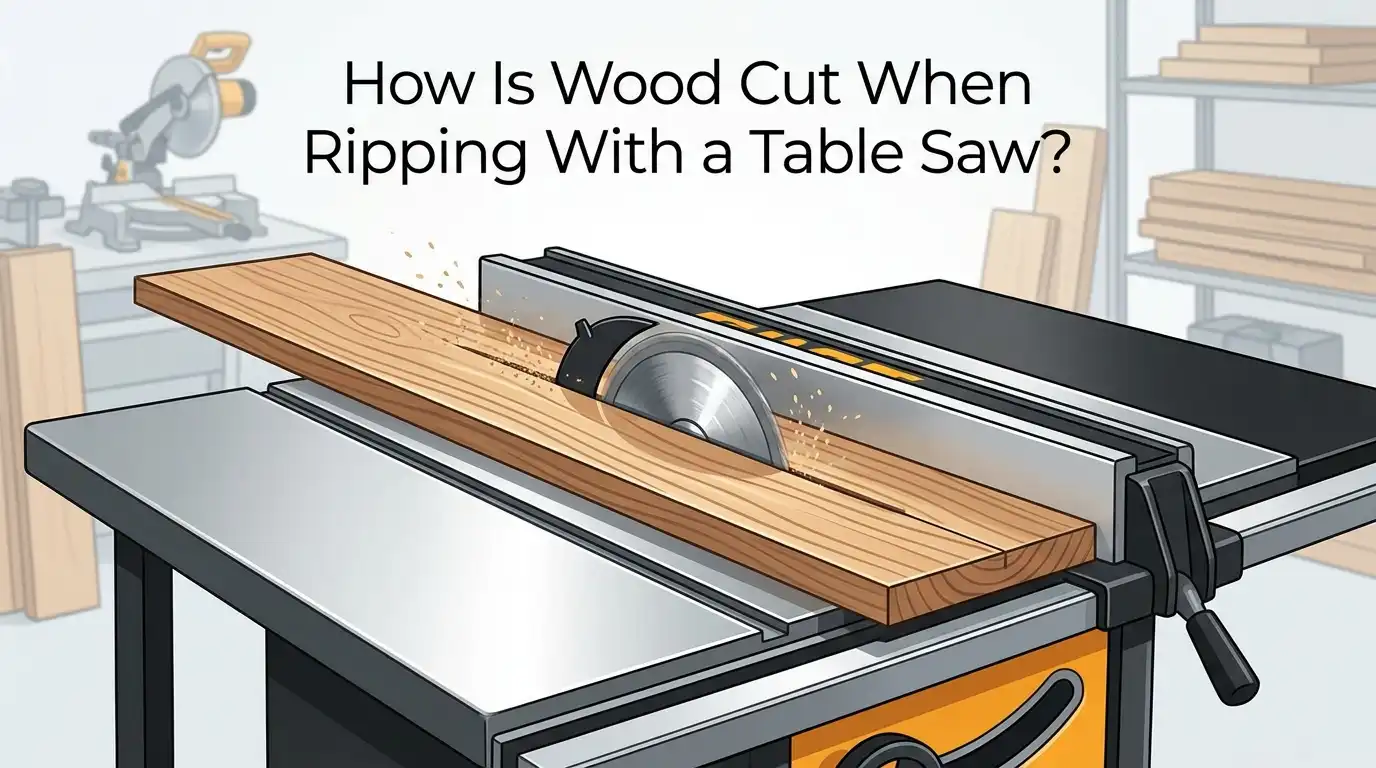
Ripping is the act of cutting a board along its grain to make it narrower. You feed the long edge of the workpiece past the spinning blade while the rip fence holds the board at a fixed distance from the teeth.
Think of it this way. A crosscut shortens a board. A rip cut narrows a board. On a table saw, the fence is your primary guide for a rip cut, while a miter gauge or crosscut sled guides a crosscut.
Common ripping tasks include sizing rough lumber for furniture parts, cutting plywood sheets into cabinet panels, and trimming boards to their final width. Ripping is the backbone of most woodworking projects, and the table saw is the most efficient tool for doing it repeatedly and accurately.
How the Blade Actually Cuts the Wood
The table saw blade rotates so that the teeth move downward into the wood at the front of the blade and upward at the back. As you push the board forward, each tooth enters from the top surface, digs into the grain, and lifts out a small chip of material.
Rip blades use a flat top grind tooth design. This means each tooth has a flat, chisel shaped edge. This shape is ideal for cutting along the grain because it shears the long wood fibers rather than slicing across them.
The gullets between the teeth carry the chips up and away from the cut. If chips are not cleared quickly, friction builds and the cut quality drops. You may notice burn marks or hear the motor strain. A blade with deep gullets and fewer teeth handles chip removal better during aggressive rip cuts.
Rip Blades vs Crosscut Blades vs Combination Blades
Choosing the right blade makes a real difference in how your rip cuts turn out. Each blade type has a distinct purpose.
A rip blade has 24 to 30 teeth with a flat top grind and a high hook angle. It cuts fast along the grain with efficient chip removal. The edge it leaves is slightly rougher than a crosscut blade, but it puts less strain on your saw motor.
A crosscut blade has 60 to 80 teeth with an alternate top bevel (ATB) grind. It produces smooth cuts across the grain but is slower and generates more heat during ripping.
A combination blade with 40 to 50 teeth offers a middle ground. It can rip and crosscut reasonably well but does neither as efficiently as a dedicated blade.
Pros of using a dedicated rip blade: faster feed rate, less motor strain, better chip clearance, and reduced burning. Cons: slightly rougher edge that may need a light sanding or jointing pass. For most ripping tasks, a 24 tooth rip blade is the best choice.
How to Set Up the Rip Fence Correctly
Your rip fence is the most important guide during a rip cut. It determines the width of the finished piece and keeps the board on a straight path through the blade.
Step 1. Confirm the fence is parallel to the blade. Use a combination square or dial indicator to measure the distance between the fence face and a single tooth at the front and back of the blade. The measurements should match within a few thousandths of an inch.
Step 2. Lock the fence at your desired width. Measure from the fence face to the closest tooth that is set toward the fence. Double check this measurement before you cut.
Step 3. Verify the fence does not “toe in” toward the back of the blade. A fence that angles inward will pinch the wood and cause kickback. A slight toe out of about 0.005 inches is acceptable and can actually help prevent pinching.
Setting the Correct Blade Height
Blade height changes the angle at which each tooth enters the wood. This affects cut quality, chip removal, and safety.
The standard guideline is to raise the blade so that the gullets clear the top surface of the board. In practical terms, this means the blade should extend about 1/4 to 3/8 of an inch above the top of the workpiece.
A blade set too low rubs against the wood instead of cutting it cleanly. This causes burning, increases friction, and puts extra load on the motor. A blade set too high increases the amount of exposed teeth above the wood, which raises the risk of injury and can cause more tearout.
Pros of correct blade height: clean chip evacuation, reduced burning, smoother cut surface. Cons of incorrect height: burn marks, rough edges, higher risk of kickback or contact injury. Always unplug the saw or disconnect power before adjusting blade height.
Step by Step Guide to Making a Rip Cut
Follow these steps for a clean, safe rip cut every time.
Step 1. Select the right blade. Install a 24 to 30 tooth rip blade for solid wood. Ensure the teeth face the correct direction.
Step 2. Set blade height. Raise the blade so the gullets sit just above the top of the board.
Step 3. Align and lock the rip fence. Set it to the desired width and confirm it is parallel to the blade.
Step 4. Install the riving knife. Make sure it is aligned with the blade and sits just below the top of the teeth.
Step 5. Position the board. Place the flat, straight edge of the board against the fence. Press the board firmly down on the table.
Step 6. Turn on the saw. Let the blade reach full speed before feeding the wood.
Step 7. Feed the board steadily with your right hand while your left hand holds the board against the fence. Use a push stick once your hand gets within 6 inches of the blade.
Step 8. Push the board completely past the blade. Do not pull it backward.
How Feed Rate Affects Your Rip Cut
The speed at which you push wood through the blade has a direct impact on cut quality. Feed rate is one of those variables that beginners often overlook, but experienced woodworkers pay close attention to it.
Too fast and the blade cannot clear chips properly. The teeth deflect sideways, and the cut wanders away from the fence line. You may also hear the motor bog down or see scorch marks on the wood.
Too slow and friction builds between the teeth and the wood. The result is a burned edge and excessive heat that can dull the blade prematurely.
The ideal feed rate produces a consistent, even sound from the blade. If the pitch rises sharply, you are pushing too hard. If you hear a high whine with no cutting noise, you are moving too slowly. Let the blade do the cutting and maintain steady forward pressure. A smooth rip cut should feel almost effortless once you find the right rhythm.
How Wood Grain Affects Rip Cut Quality
Wood is a natural material with variations in density, grain direction, and moisture. All of these factors influence how cleanly a rip cut turns out.
Straight grain boards with consistent density are the easiest to rip. The blade teeth shear the fibers cleanly, and the cut surface comes out smooth.
Figured or interlocked grain presents more resistance. The fibers change direction unpredictably, which causes tearout and rough patches on the cut face. A slightly slower feed rate and a blade with a lower hook angle can help reduce this problem.
Wet or resinous wood adds another challenge. Moisture increases friction, and resin can gum up the blade teeth. If you must rip green or resinous lumber, clean the blade frequently and reduce your feed rate. A blade lubricant or coating can also help the teeth shed sticky material.
Safety Essentials for Ripping on a Table Saw
Ripping generates more kickback risk than most other table saw operations. The board is in constant contact with the blade over a long distance, and internal wood stresses can cause the kerf to close behind the blade.
Use a riving knife. This thin metal plate sits directly behind the blade and prevents the two halves of the board from pinching the back teeth. It is the single most effective safety device for preventing kickback during rip cuts.
Use push sticks for narrow boards. Any rip cut that brings your hand within 6 inches of the blade requires a push stick. For very narrow strips under 2 inches, use a push stick in each hand.
Stand to the side of the blade, not directly behind it. If kickback occurs, the wood launches backward along the cut line. Standing slightly to the left puts you out of the danger zone.
Never reach over or behind the spinning blade to retrieve a cutoff piece. Wait for the blade to stop completely or use a stick to pull the piece away.
Common Rip Cut Problems and How to Fix Them
Even experienced woodworkers run into issues during rip cuts. Here are the most frequent problems and their solutions.
Burn marks on the cut edge. This is caused by a dull blade, slow feed rate, or misaligned fence. Sharpen or replace the blade, increase your feed speed slightly, and check fence alignment.
The cut wanders away from the fence line. A dull blade, excessive feed rate, or warped board is usually responsible. Make sure the board has a flat face and a straight edge before ripping. Joint the edge first if necessary.
The board lifts off the table during the cut. This happens with warped or cupped lumber. Use a featherboard clamped to the table to hold the board down, or flatten the board before cutting.
Kickback. The wood suddenly shoots back toward you. This is caused by a pinched blade, missing riving knife, or fence misalignment. Always install the riving knife and verify fence alignment before every ripping session.
Ripping Narrow Boards Safely
Ripping thin strips is one of the riskier operations on a table saw. The narrower the piece between the blade and the fence, the closer your hand gets to the spinning teeth.
For strips wider than 2 inches, use a standard push stick with a notch at the end. Keep steady downward and forward pressure on the piece between the blade and fence.
For strips narrower than 2 inches, use a push stick on the narrow piece and a push block on the wider piece. Some woodworkers prefer to place the narrow strip on the outside of the blade, away from the fence, so the wider board stays firmly against the fence.
A shop made push shoe with a wide base gives better control than a thin push stick for very narrow rips. You can make one from a scrap of 3/4 inch MDF or plywood in about five minutes.
Pros of using a push stick system: keeps fingers safe, provides consistent pressure, easy to make from scrap wood. Cons: adds a few seconds per cut and requires practice to use smoothly.
Rip Cut vs Crosscut: Key Differences
Understanding the difference between a rip cut and a crosscut helps you choose the right setup and blade for every project.
A rip cut follows the grain and reduces the width of a board. The rip fence guides the workpiece. The blade teeth shear long fibers. A low tooth count blade works best. The cut surface is typically rougher.
A crosscut goes across the grain and reduces the length of a board. A miter gauge or crosscut sled guides the workpiece. The blade teeth slice short fibers. A high tooth count blade produces a smoother finish.
You should never use the rip fence as a stop for crosscuts on long pieces because the cutoff can get trapped between the fence and the blade, causing kickback. Each cut type has its own setup, blade, and technique. Mixing them up leads to poor results or dangerous situations.
Tips to Improve Your Rip Cut Results
A few small adjustments can make a noticeable difference in your rip cut quality.
Keep your blade clean. Pitch and resin buildup on the teeth increases friction and causes burning. Clean your blade with a dedicated blade cleaner every few weeks.
Joint one edge before ripping. A straight, flat reference edge rides the fence cleanly and produces a parallel cut on the opposite side. Ripping a board with a rough or curved edge leads to inconsistent widths.
Use outfeed support for long boards. A board that tips off the back of the table can pull your hands into the blade or cause the cut to bind. A roller stand or outfeed table prevents this.
Check your blade for flatness and wobble. A warped blade or loose arbor nut causes wavy cuts and poor edge quality. Spin the blade by hand and watch for side to side movement before you start the saw.
Replace dull blades promptly. A sharp blade cuts with less effort, produces smoother edges, and reduces the risk of kickback.
Frequently Asked Questions
What direction does wood move during a rip cut on a table saw?
The wood moves lengthwise along the table, parallel to the blade. You push the board from the front of the saw toward the back, feeding it past the spinning blade. The rip fence runs parallel to the blade and holds the board at a consistent distance. The board’s long edge stays in contact with the fence throughout the entire cut.
How many teeth should a rip blade have?
A standard 10 inch rip blade should have 24 to 30 teeth. Fewer teeth mean larger gullets, which help clear chips quickly during long rip cuts. A 24 tooth blade is the most popular choice for ripping solid hardwood and softwood. More teeth produce a smoother finish but cut slower and build more heat.
Can I use a crosscut blade for ripping?
You can, but the results will not be ideal. A crosscut blade has 60 to 80 teeth with small gullets. During ripping, it clears chips slowly, builds excess heat, and can cause burn marks on the cut edge. It also puts more strain on the motor. A dedicated rip blade or a 40 tooth combination blade works much better.
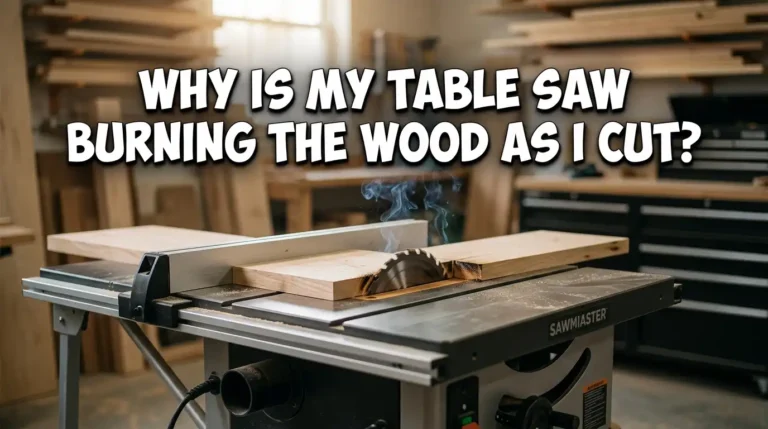
Why does my table saw burn the wood during rip cuts?
Burning usually comes from a dull blade, a feed rate that is too slow, or a fence that is slightly misaligned. Check your blade sharpness first. Then verify that your fence is parallel to the blade. Finally, try increasing your feed rate slightly. A clean, sharp blade with correct fence alignment eliminates most burning problems.
What is the most common cause of kickback during ripping?
The most common cause is a missing or improperly installed riving knife. Without a riving knife, the two halves of the board can close behind the blade and pinch the back teeth. This causes the blade to grab the wood and throw it back toward you at high speed. Always install the riving knife and verify your fence alignment before ripping.
Do I need a push stick for every rip cut?
You need a push stick any time your hand would come within 6 inches of the blade. For wide boards, you can safely use your hands to guide and push the workpiece until the final few inches of the cut. For narrow strips, use a push stick from the very beginning of the cut. Having two push sticks available is a smart habit.

Hi, I’m Leah Ray — the voice behind CraftBench Vault. I’m a passionate woodworking enthusiast dedicated to reviewing the best wood cutting tools and woodworking products. Through honest research and hands-on experience, I help fellow crafters make smarter buying decisions. Welcome to my workshop!